
Using Obsidian for Literature Reading and Blog Writing

I only started using Obsidian recently, so this post is a quick record of my workflow.
I mainly use Obsidian to write and manage blog posts and literature-reading notes.
Obsidian and plugin usage
-
Recommended tutorial: An Incomplete Beginner Guide to Obsidian
Obsidian represents the idea of bidirectional linking: notes can connect to each other and gradually form a network of knowledge. For me, the real reason to use Obsidian is its absurdly good plugin ecosystem. It makes writing and organizing notes genuinely enjoyable.
A quick note: the minimum entry requirement is knowing basic Markdown syntax.
Downloading the software
Download the app from the official website: https://obsidian.md/
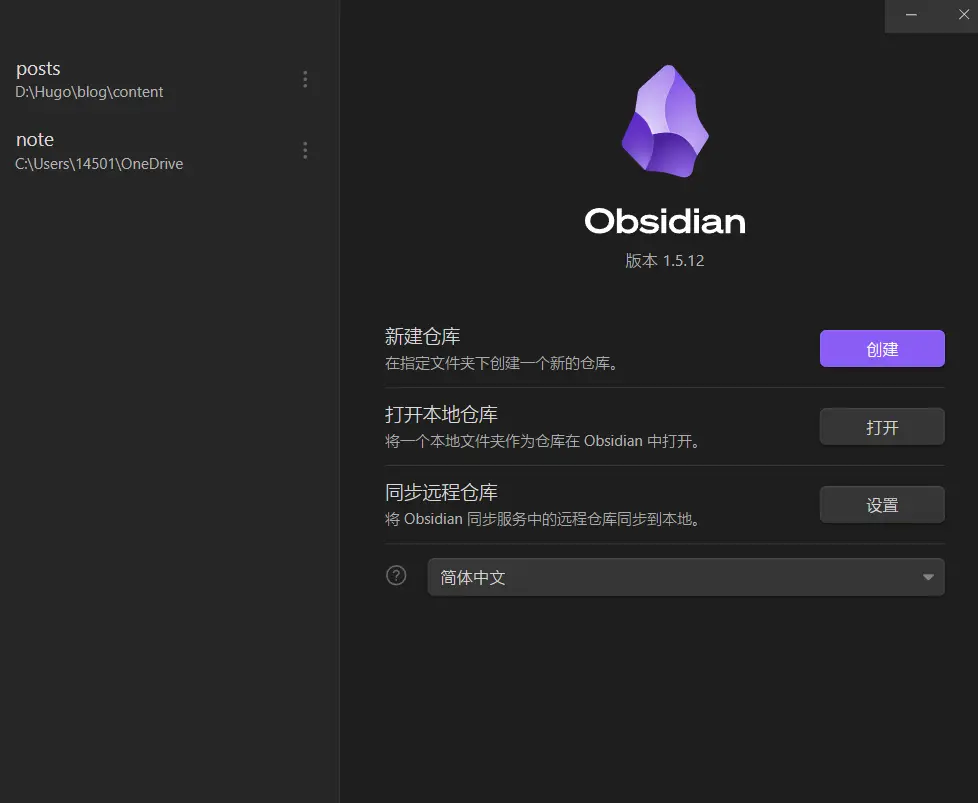
After installing it, the startup screen looks like this. A vault is simply the folder where your notes are stored. In my case, I keep separate vaults for blog writing and literature notes.
.obsidian folder appears inside it. That folder stores the app settings, including plugins, interface style, and so on.
My own layout looks like this:
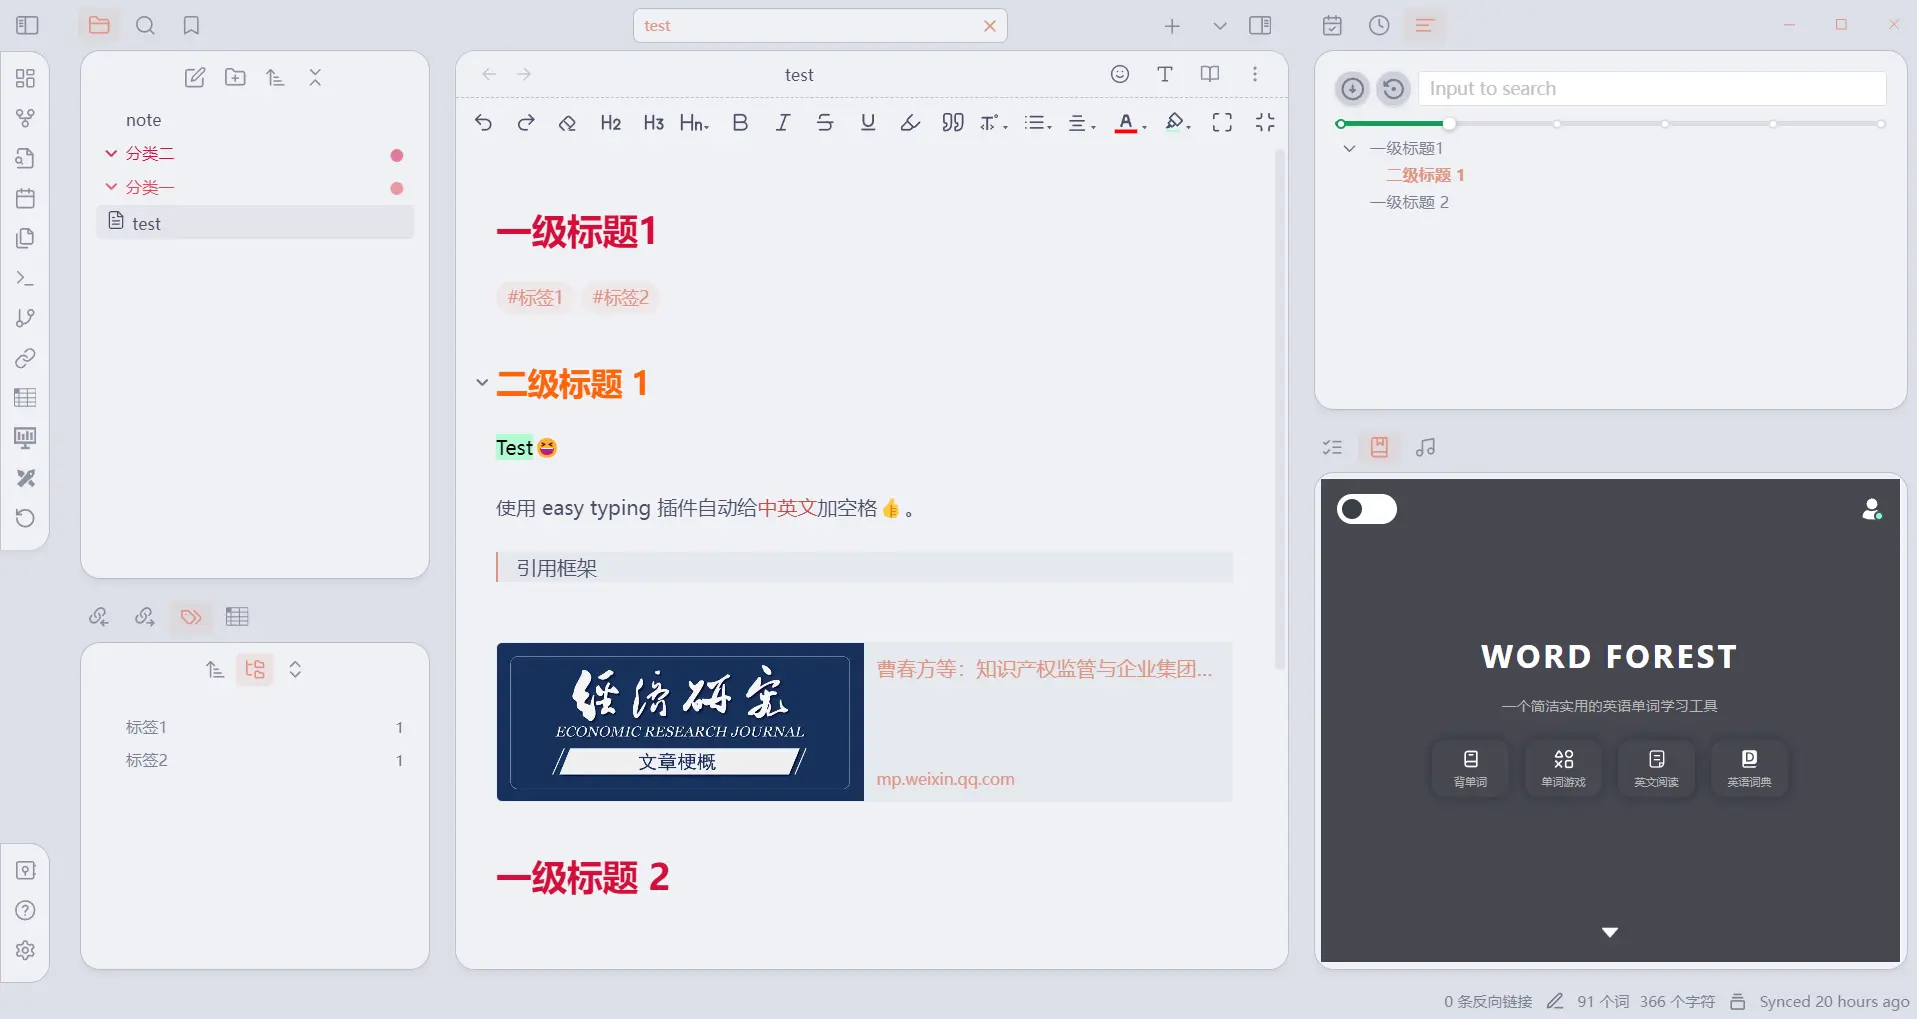
The rich have a second monitor. The rest of us make do with split view 😤
Obsidian settings:
Just replace the
.obsidianfolder in the vault.You can download my
.obsidianconfig from my GitHub repository.After downloading it, remember to unzip
themes.zip.
Each vault has its own settings. That means every vault can use a completely different theme and plugin setup. I really like this, because writing blog posts and managing notes often call for different tools, so independent vault settings feel necessary.
Interface fonts
You can change the interface font in Settings -> Appearance -> Font.
About bidirectional links
- Document properties: if the first line is blank, type
---three times to add document properties. If the first line is not blank,---creates a horizontal rule instead. - Adding tags:
#tag1,#tag2 - Links:
|
|
Plugin usage
After replacing the .obsidian folder, open the vault, click Trust author, and turn off safe mode.
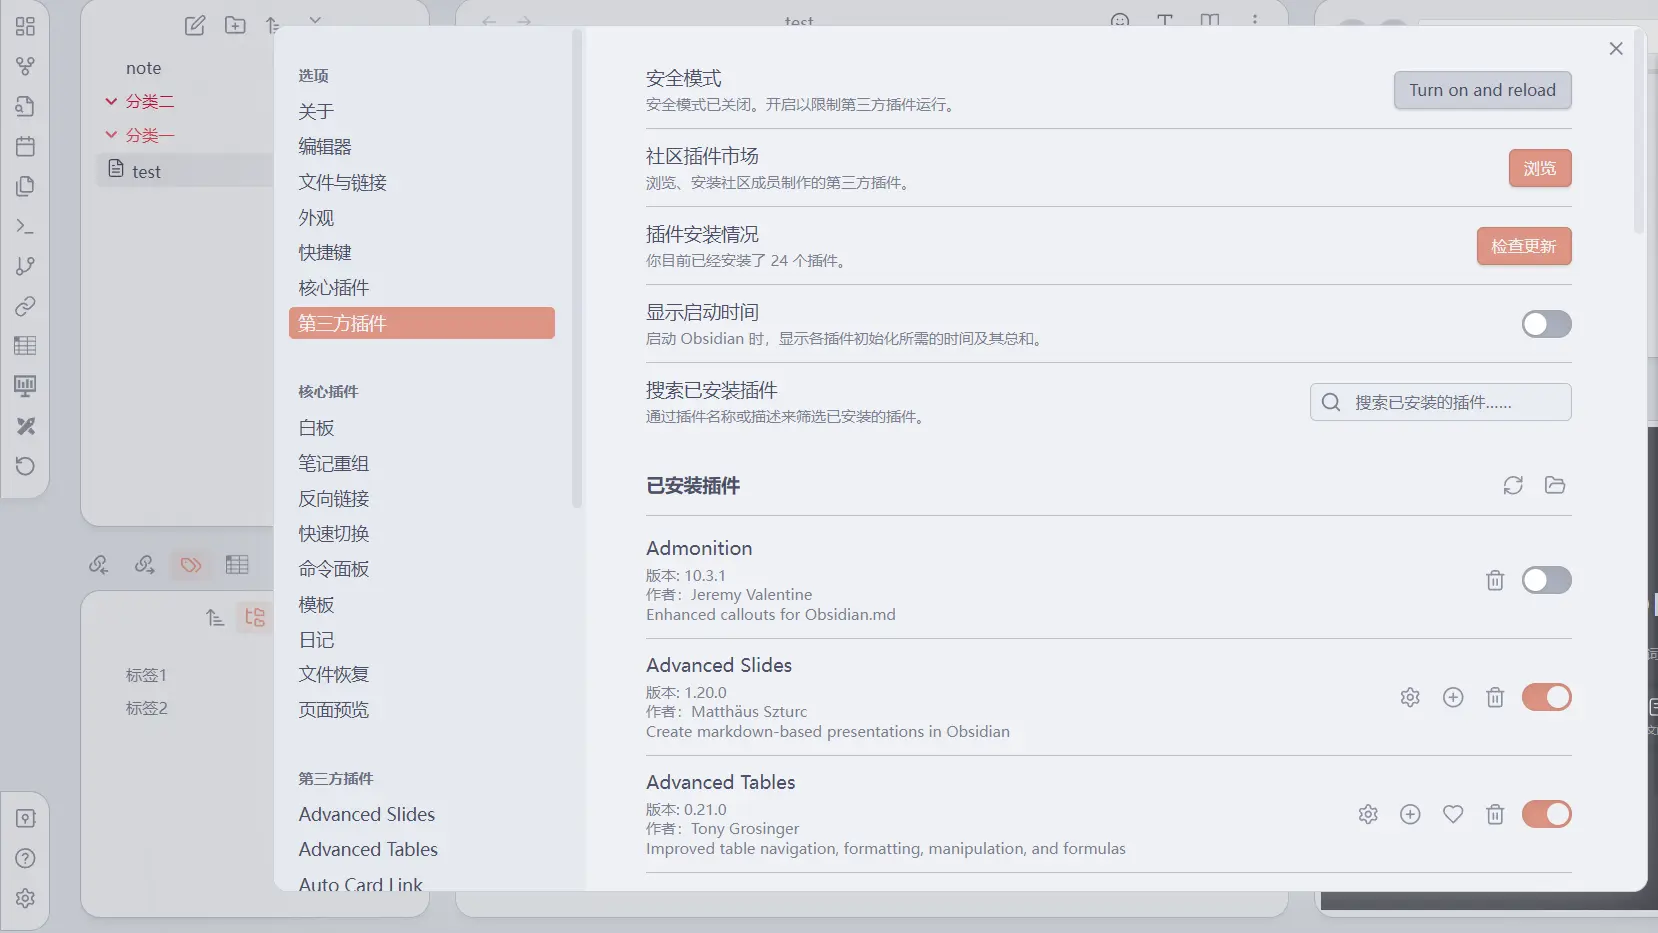
Settings in the lower-left corner to open all installed plugins.
You can also check for plugin updates and browse the community plugin marketplace (you need a VPN/proxy for that).
Command
Most plugins are easy enough to use once they show up in the interface. The rest are mainly driven by keyboard commands.
Click the >_ icon in the far-left sidebar (shortcut: ctrl+p), type the command you want in the pop-up, and run the plugin from there.
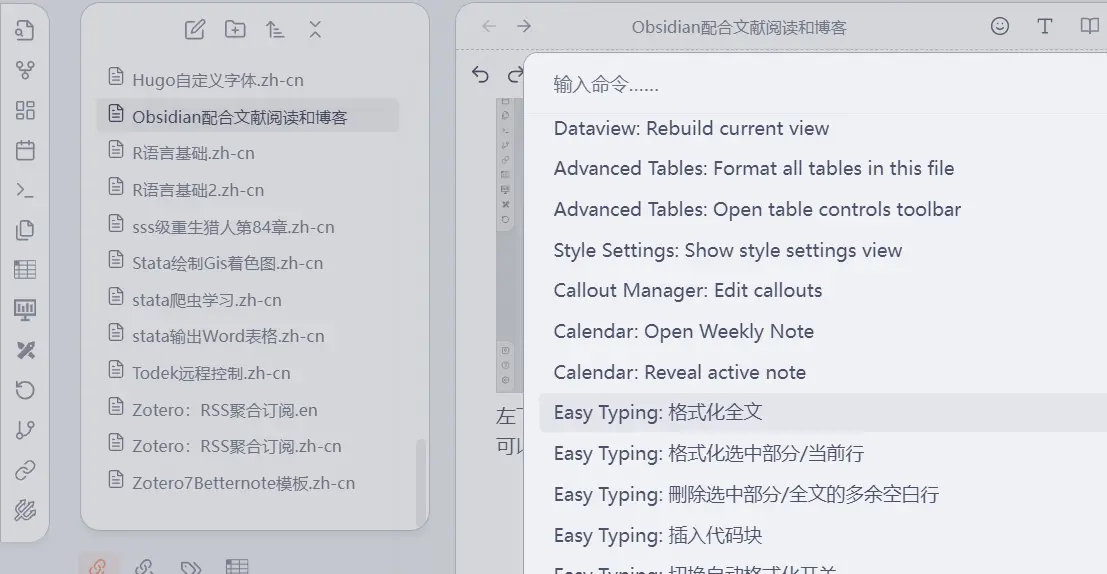
The Command plugin can also help you add quick-access buttons for commands.

Open the right-click menu, or click the three-dot icon at the top right of the note pane, then choose Add command. After going through choose command -> choose icon -> choose name, the shortcut button is added.
Pandoc
It is not enough to install only the plugin.
Obsidian notes use Markdown syntax and can export to PDF. Pandoc lets you export to more formats too, such as LaTeX, epub, and HTML.
There are two steps:
Go to the official site and download the Pandoc application itself.
Then install and enable the Pandoc plugin and the Enhancing export plugin. In the settings for both plugins, fill in the Pandoc file path and set the export directory.
After that, an Export as... option will appear under the three-dot menu in the top-right corner of the note pane.
Easy typing
This is one of the main plugins that sold me on Obsidian. When you write documents that mix Chinese and English, there are lots of little conventions to keep track of. For example:
- Put spaces between Chinese text and numbers or English words;
- Switching input methods is annoying;
- English sentences should start with a capital letter.
With easy typing enabled, numbers and English words are automatically spaced in Chinese text; typing a Chinese punctuation mark twice turns it into the English version; and the first letter of an English sentence is capitalized automatically…
Annotator
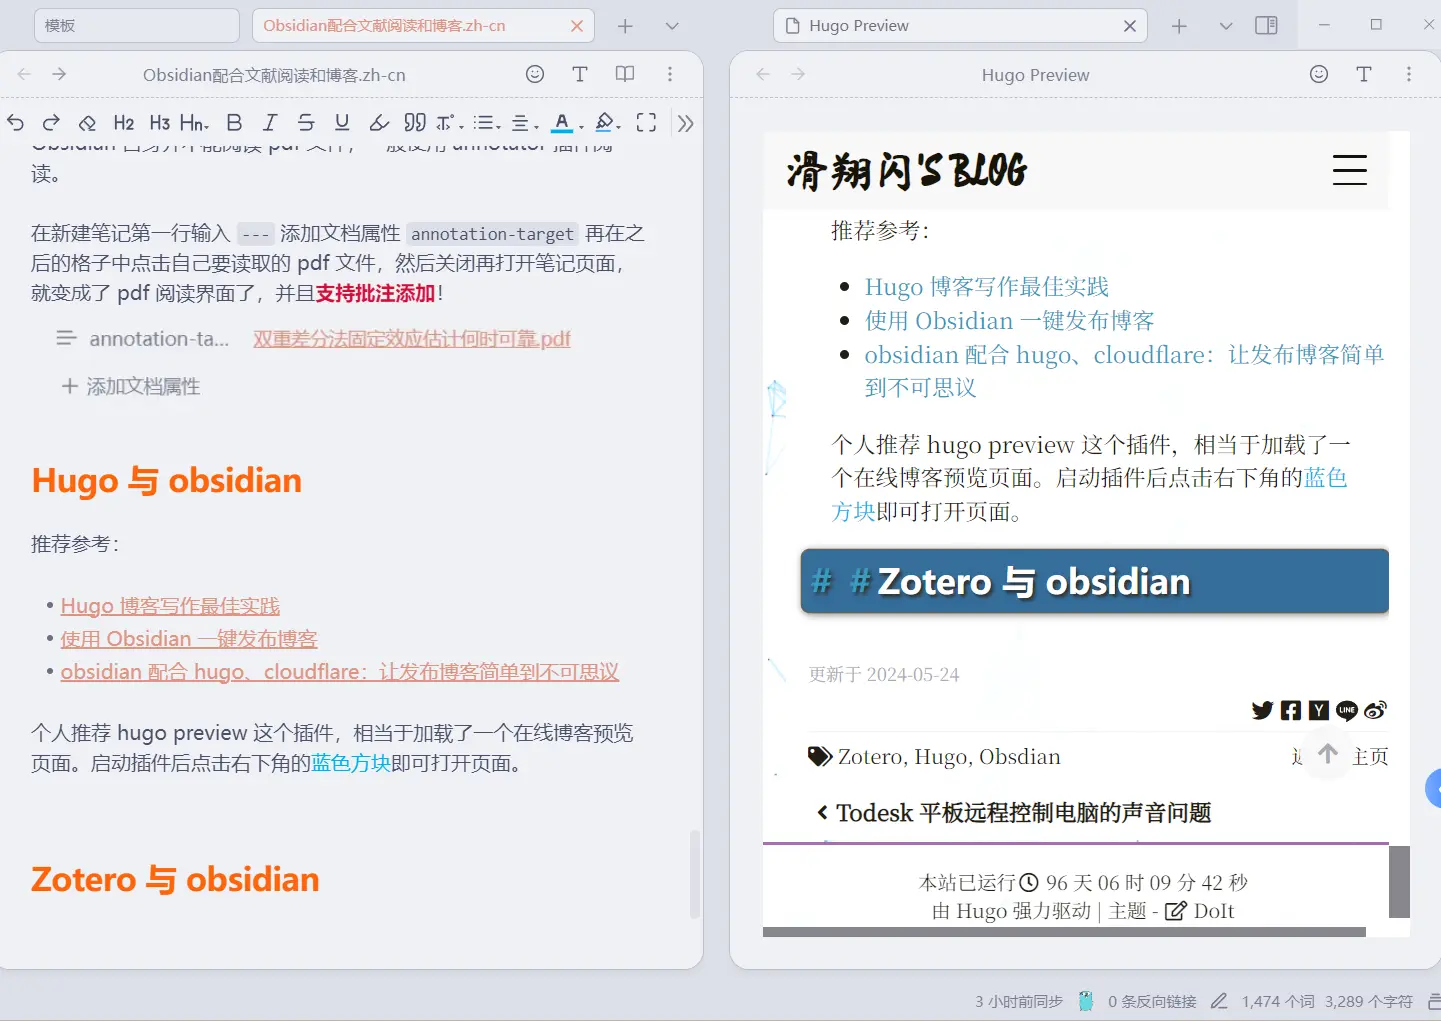
Obsidian itself cannot read PDF files directly, so people usually use the annotator plugin.
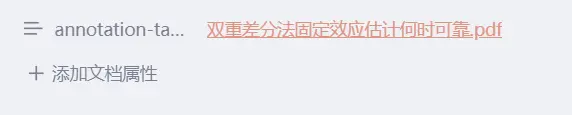
In a new note, type --- on the first line to add document properties, then add annotation-target, click the field that appears, and choose the PDF you want to read. Close and reopen the note, and it turns into a PDF reading interface that also supports annotations.
Copilot chat
There are roughly three ways people integrate AI into Obsidian. One is direct embedding, where you continue writing notes from context through commands. Another focuses on built-in file search and note-style management.
The third keeps the conversation in a sidebar. Personally, I recommend that third route, and Copilot chat is the plugin I would pick.
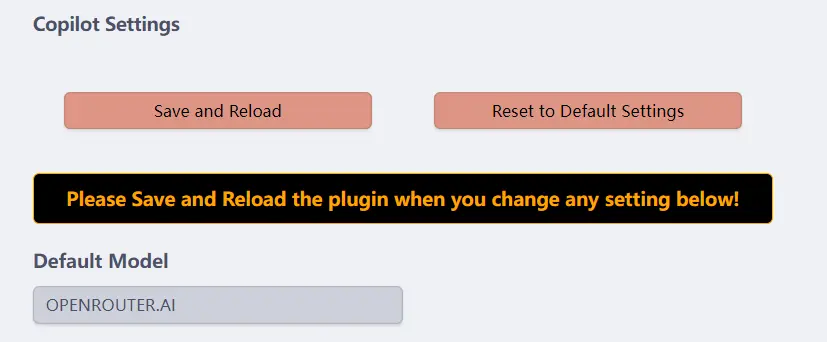
After installation, open the settings page.
For Default model, I recommend choosing OPEENROUTER. AI. It is basically a broker that lets you access different models through one service.
Scroll down a bit further and you will find the place to enter the OPEENROUTER API.
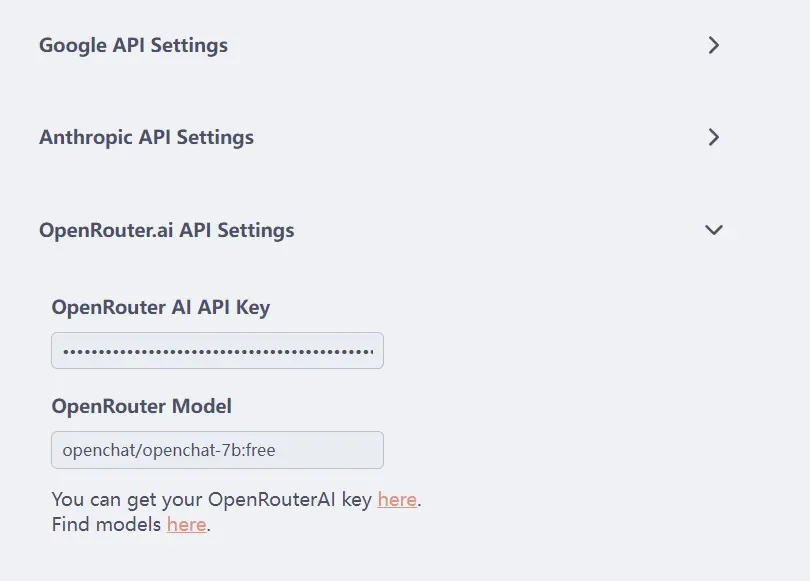
The model list is here:
You are not limited to GPT-3.5 either. Just search for the keyword free, and the listed AI models can all be used for free.
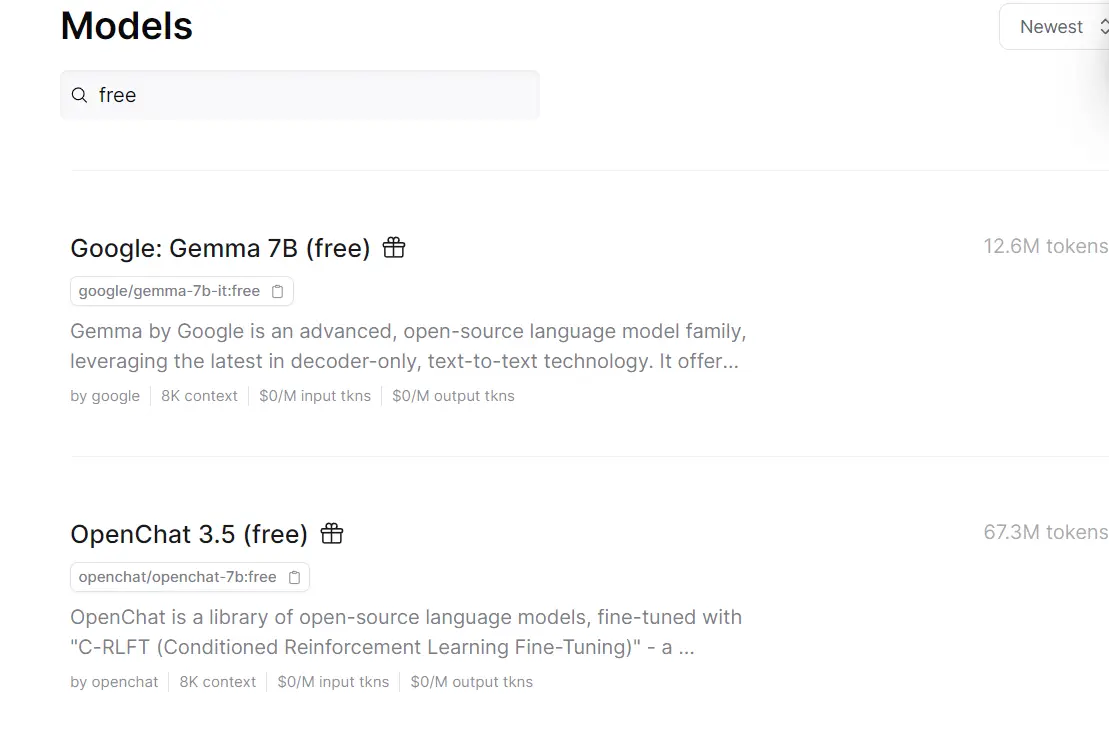
For example, copy one of the following model names into openrouter model:
|
|
Click Copilot chat in the left sidebar, and an AI chat panel will appear on the right. It can read your notes too.
Other plugins
Better word count: counts Chinese characters more accurately (Obsidian already has a word count in the bottom-right corner).
Footnote shortcut: gives you a better footnote editing experience. It can add footnotes through commands automatically, and if you run the footnote command again on an existing footnote, you can jump between the footnote marker and the footnote content at the end of the article.
Word Splitting for Simplified Chinese in Edit Mode and Vim Mode: when you double-click a sentence, this plugin does a better job recognizing Chinese word boundaries.
Obsidian and mobile devices
How to sync Obsidian files in March 2022 (a stage-by-stage summary)
One of Obsidian’s weak spots is cross-device syncing: it can be fiddly and unreliable. If you can afford the official service, that is still the best option.
Short version:
Cross-platform sync: Remotely save
Remotely save (sync plugin) has been one of the most discussed plugins lately, and the tutorial page already collects a lot of material:
- Obsidian sync: Remotely Save S3 setup guide by 恐咖兵糖
- Third-party sync plugin (an introduction to Remotely save) by 软通达: Dropbox
Using the Obsidian Remotely Save plugin to sync desktop and mobile by yaozhuwa: OneDrive method
(In my own tests, the plain Remotely save + OneDrive setup was already broken. On Android, OneDrive folder recognition has issues, so you need a third-party transfer tool such as FolderSync to act as a OneDrive middle layer, and even then you still have to trigger syncing manually.)
- The most comfortable third-party multi-device sync setup for Obsidian by 维客笔记:Dropbox
- Tutorial on pairing the Remotely plugin with Tencent Cloud COS by 八宝周:Tencent Cloud, S3
- Using the Remotely save plugin with Obsidian to sync via Nutstore by BCS:Nutstore, WebDAV
- Using Remotely Save with Alibaba Cloud OSS for multi-platform sync by zm:Alibaba Cloud OSS, S3
PC and Android sync
On Windows and Android, you can consider Syncthing (sync software) or a similar option such as 微力同步. See also Using Tencent Cloud to build Syncthing for syncing Obsidian by 软通达.
Mac and iOS sync
You can consider iCloud. I do not have the devices myself, so I have not tried it.
Computer-to-computer sync only
I recommend sync tools such as Nutstore. Just keep two things in mind:
- Do not keep Obsidian and the sync software open on both machines at the same time, or saving errors may occur.
- Make sure you understand the difference between a sync disk and a storage disk (cloud drive).
Hugo and Obsidian
Recommended reading:
- Best practices for writing with Hugo
- One-click blog publishing with Obsidian
- Obsidian + Hugo + Cloudflare: making blog publishing ridiculously simple
I would also recommend the hugo preview plugin. It basically loads an online blog preview page inside Obsidian. Once the plugin is enabled, click the blue square in the lower-right corner to open it. In practice, it is just importing a specific webpage into Obsidian for preview.
Another plugin worth mentioning is mermaid. The LoveIt Hugo theme supports flowchart rendering, and I can never remember every last detail of the syntax, so this plugin helps a lot.
I still use local image references for now (I just like managing files locally 😀),
- imge converter can automatically compress, rename, and convert image formats;
- the clear unsed images plugin can help clean up local images that are no longer referenced.
As for changing image reference paths (copying post/img to static/img) and pushing the blog to Git, I do not use Obsidian’s Git plugin. I let .bat scripts handle both jobs instead (honestly, just letting GPT write them is enough), and it is simple. That way I can focus on writing.
As for creating new blog templates, there is no need to set up a quick plugin. Obsidian already has built-in template support: just create a template folder, put your Markdown template files in it, and when you create a new post, click the corresponding template-import icon in the left sidebar.
Zotero and Obsidian
Recommended reading: Zotero + Obsidian workflow roundup - the most complete 2023 guide
The sad part is that the best solutions are usually paid 🤧.
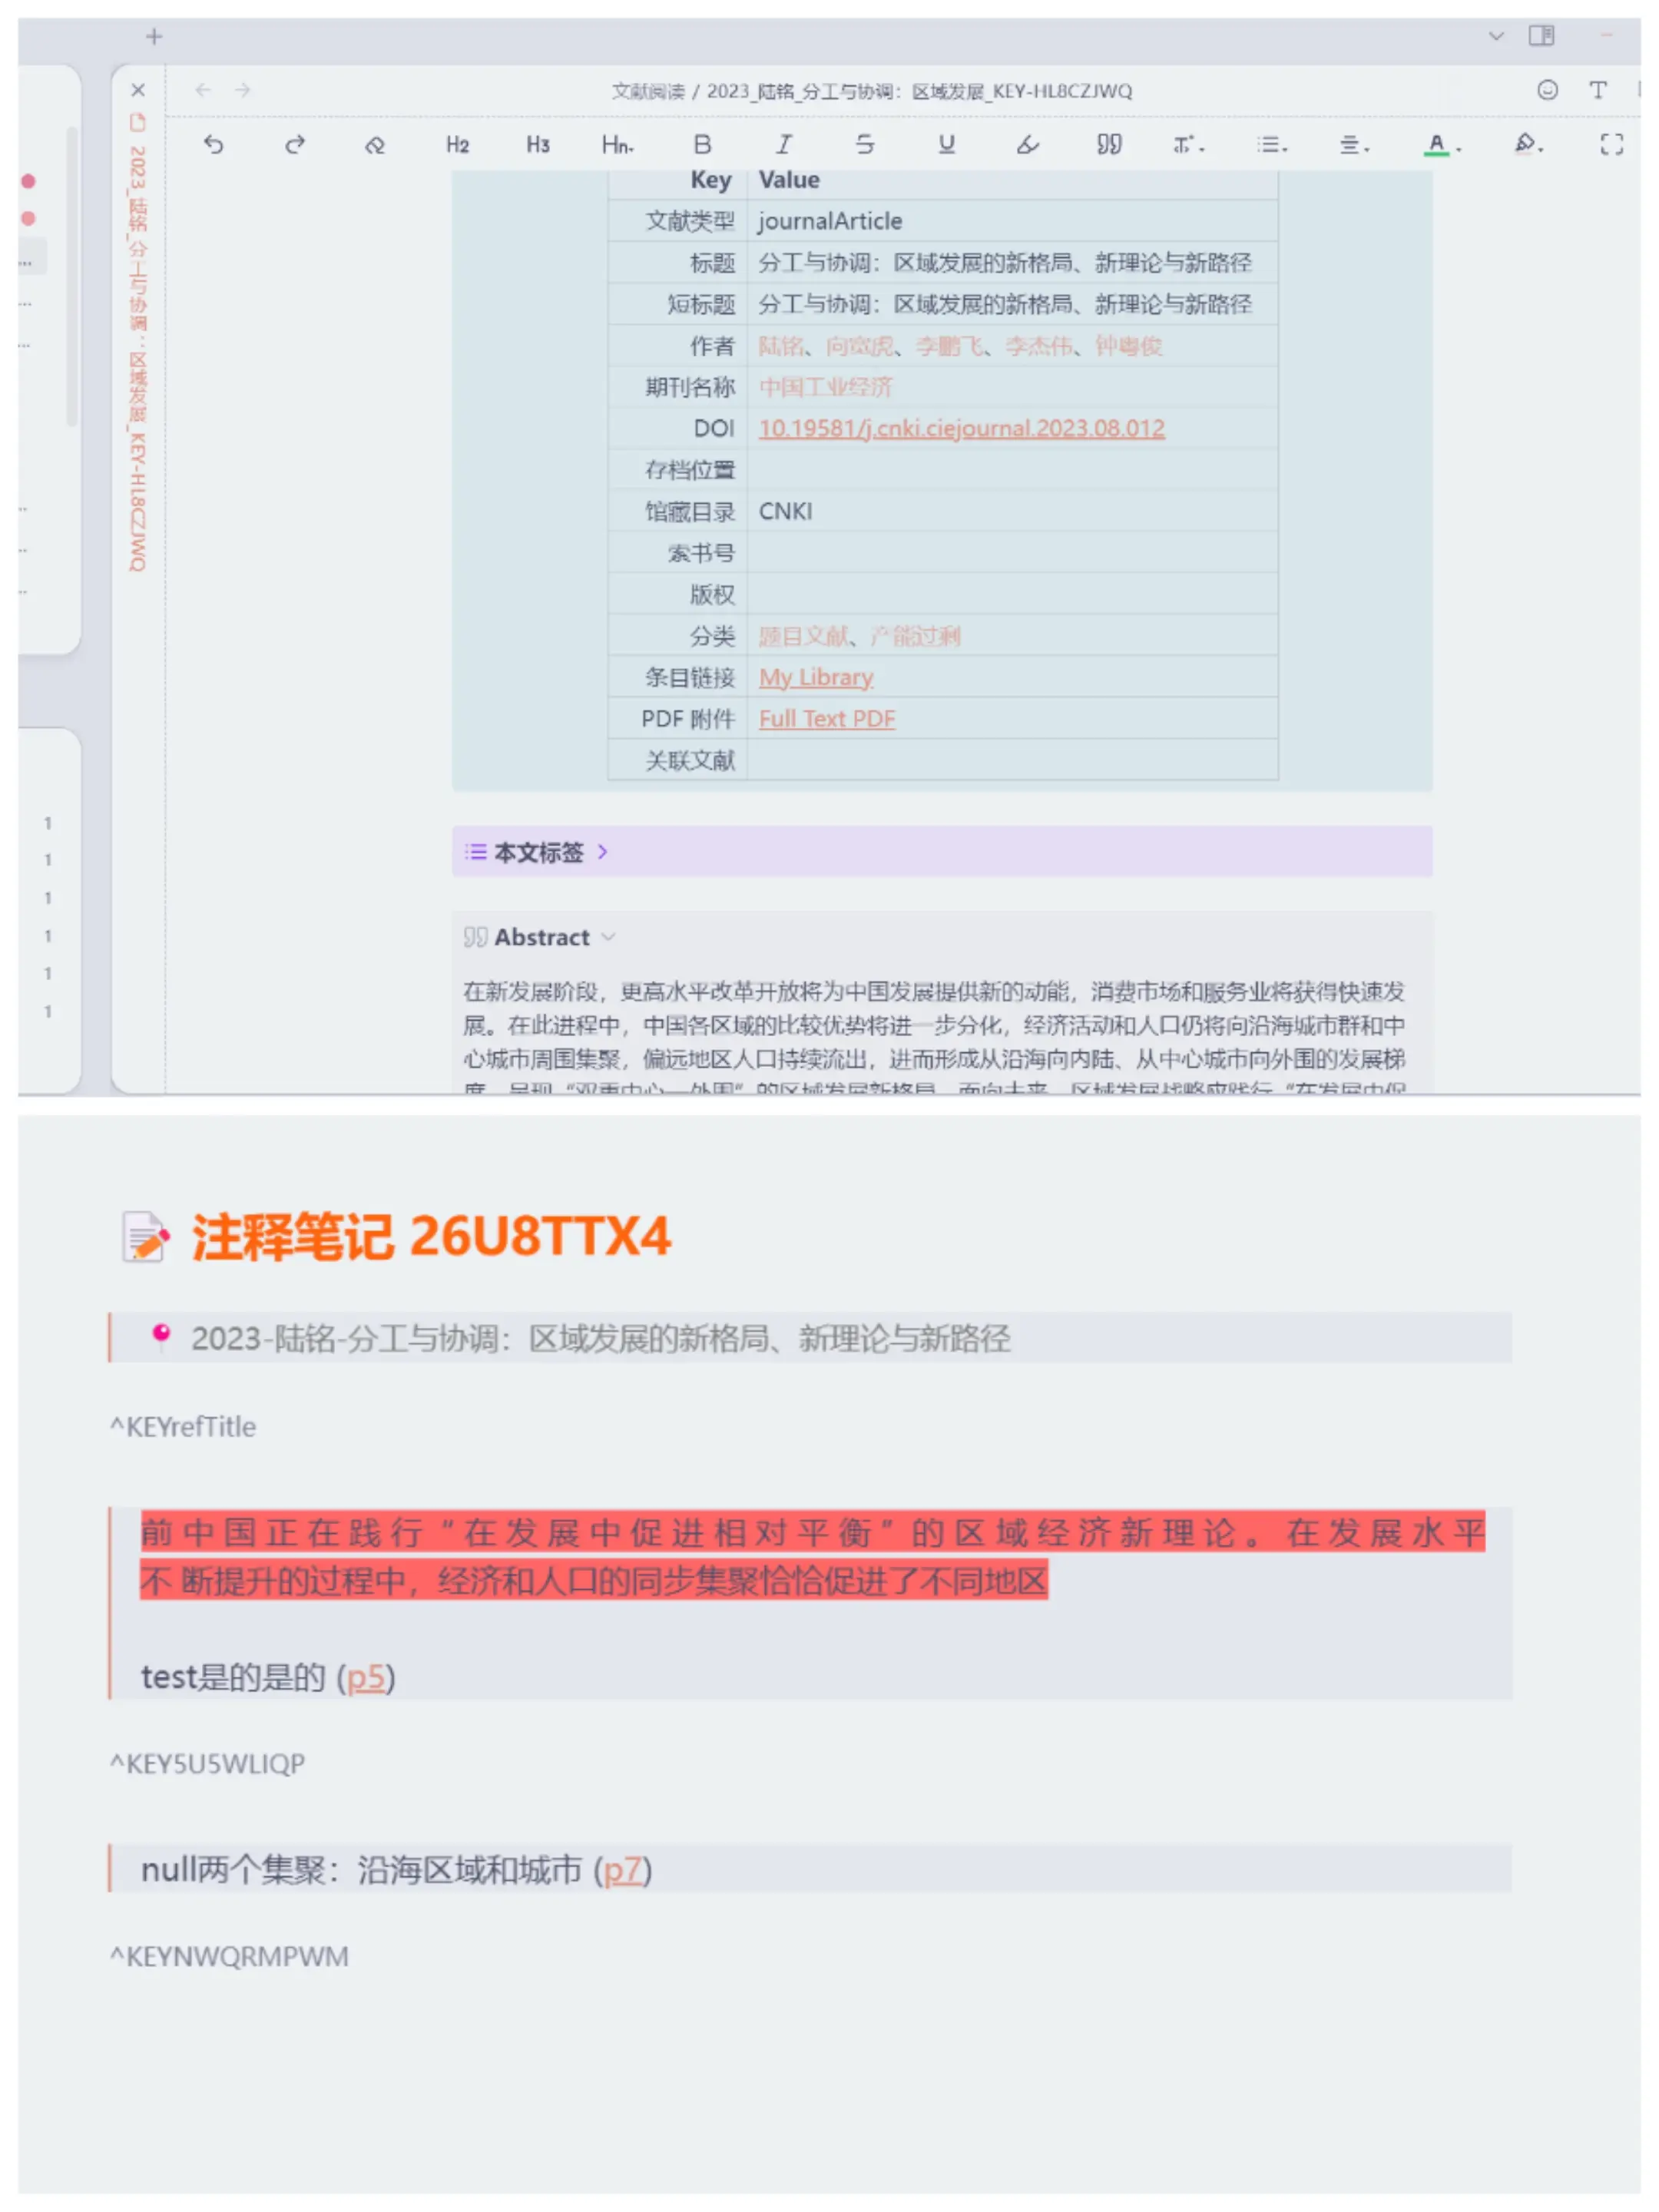
When Zotero 7 had just been updated, I paid for a plugin from Qingning Academic. It let me move Zotero annotation notes into Obsidian almost seamlessly.
By 2024, Zotero had split into Zotero 6 and Zotero 7, and the author of the mdnote plugin had explicitly said they would not keep improving compatibility for Zotero 7. That left even fewer options.
Another free setup I am currently using is Zotero’s Better Note plugin together with Obsidian’s Zotero Integration plugin.
My Zotero Better Note template and tutorial
Create literature notes with Better Note in Zotero, then import those notes into Obsidian through the Zotero Integration plugin for further organization.
The note-taking app debate
A lot of people online compare Notion, Obsidian, and other note-taking apps. I picked Obsidian mainly for its rich open-source plugin ecosystem and the peace of mind that comes with local storage.
That said, the usual complaint about Obsidian is easy enough to understand: there are too many plugins, the features can get flashy, and the learning curve is not exactly low, so the priorities sometimes feel blurred. Even so, I still have not used Obsidian to build a proper knowledge graph. Just using it as a writing tool already feels great.
Beyond that, Obsidian was originally meant to help people build a knowledge system. What inspires me in other people’s setups is not how pretty their notes look, but how they use Obsidian to carry out their own way of organizing information🦾. Using plugins to rotate periodic notes for review; building keyword-based note blocks and expanding them over time; connecting Obsidian with other tools to refine a workflow; combining note structure with design…